Welcome, All Things Jeep is now ExtremeTerrain!
Talk to a Wrangler Sales Tech
1-877-870-8556
M-F 8:30A-11P, Sat-Sun 8:30A-9P
Logo Image
$20K Sweeps! 10 Chances to Win! Enter Daily >

Rugged Ridge Interior LED Courtesy Light (07-18 Jeep Wrangler JK)

Item J12947
Verify parts fit and get product recommendations.
Wrangler Sales Techs: Connect Now M-F 8:30A-11P, Sat-Sun 8:30A-9P
$0.00
Our Price

$39.99

FREE Shipping on orders over $119 Market Price $47.99 You Save 17% ($8.00) Up to 10% off for Military & First Responders! See Details

Will this fit your Vehicle?

Select a different vehicle Help?
Update or Change Vehicle
Ship to: Ashburn - 20149
Sorry, please enter a valid US or CA postal code
We're sorry, zip can't be updated at this time.
    Create a list
    Add to New List

    Saved - View your saved items

    We're sorry. We couldn't save this product at this time.

    or use

      Video Review & Installation

      Hey, guys. Today, I'm here with the Rugged Ridge Interior Roll Bar Mounted LED Courtesy Light fitting all 2007 to 2018, JK and JL Wranglers. This is going to be a perfect option for someone looking for extra visibility inside their cab area for those dark times at night where you're trying to gather some things, trying to get out of your JK, or really trying to gain some extra visibility in any specific area inside of your Wrangler. So, the earlier generation JKs do not have the front dome light, which can be very annoying. I personally know from my Wrangler, it's hard to see at night so this is going to be a perfect solution to mount up in the front area to gain a little bit of extra visibility. So, on the later generations that do have the dome light, this is still going to be a great option to mount in any other specific area, even up at the front here for that extra visibility. So, even if you wanted to mount it up in your cargo area, that's perfect for when you're out on the trail or it's dark out and you need that extra light to see what's going on in your cargo area. So, this will be a very small mod but you will take notice of this and appreciate it down the line. So, at the moment, this will be roughly $30 on the site right now and there's really nothing else to compare it to since this is a one-of-a-kind of interior light. So personally, I think for $30, that this is pretty solid. You do get a very bright LED light out of this to gain a lot of that extra visibility that you may be looking for. The only thing that I would have liked to see out of this for $30 is that it did include the batteries. However, that is not a big problem. Batteries are very easily accessible, so I don't think of that as a drawback. So install will be a one out of three wrenches on the difficulty meter. This does come with screws to install, but you can mount this wherever, however you like. You can mount this in the back cargo area or really wherever else on a flat surface with these screws provided, velcro or even some 3M tape. So, speaking of the install, let's jump into that now. The tools that I used for my install were a drill, a Phillips head screwdriver, a Sharpie marker, a 7-millimeter wrench, and a very small drill bit. So, first things first, we want to figure out where we are going to place our light and how we want to orient it before we go ahead and self-tap any of these screws or drill out for our provided screws. So, what I'm going to do is just mount this right here. This is a great location, this is actually a recommended location by Rugged Ridge. This is perfect if you have one of the older models, you don't have a dome light and you're just looking for a little bit of extra visibility while you're in front or in the passenger or driver's seat. And we do want to make sure that it is oriented this way so we have full access to our on and off button. So, with this here, we're just going to slide this bracket off so we can mount this up and go ahead and mark for our holes that we're about to tap. So, our next step will be to align our bracket and take a marker and mark where we want to drill or tap into our interior. So, this is a good point here above rearview mirror. I'm just going to take a Sharpie marker and mark two holes. So, now what I'm going to do just because I want to make sure that there's nothing behind here that I will hit with my small drill bit, you can also use a Dremel, but I am just going to pull this off. You can use a trim removal tool, but this will pop off pretty easily, and we can actually take this off of the car so we can mount this up, and then bring it back and put it back on. So after we go ahead and pop that center piece out, what I just want to do is go ahead and align this up again. I'm just going to pop this off, making sure that it is oriented in the correct way with the switch facing you. We want to make sure that we have easy access while we are inside the cab area so we will be mounting it up here. I would recommend to try to keep it as centered as possible with the cutout for the Footman loop since that is in the center. I'm just going to mark this up again, since this is a better visual, I have a better control, I'm not holding this upside down, making sure that everything is straight, so then I can drill two holes. Now, I'm going to take a 3/32" drill bit. They said they provided us with self-tapping screws, however, they do not. You are provided with two screws, yes, but they do come with a bolt to attach on the other side. So, what I'm going to do is just make a small pilot hole so that we can attach this onto there. So, I am going to take the drill, then we can drill our other hole. So, the 3/32" drill bit was just a hair too small, so we stepped it up to a 7/64" drill bit. So I'm just going to widen the hole just a little bit so we can thread our screw through. And since this is plastic, this is very easy to manipulate. All right. So now that is widened up, we can take our bracket, and our screws. I have one screw already through the bracket. We are just going to thread that into the one hole. I'm just using a Phillips head screwdriver in order to secure that down. Now, we can take our other screw, do the same thing on the other side. All right, so once you can see a decent amount of thread on the other side, we can take the nut that came with this just to make sure that this stays in place and is very secure, and just thread that on. You won't have a ton of thread to work with here, however, you still will be able to secure it down and we can make sure that everything is tight on the interior. Now, you can mount this to really any flat surface that you find in your Jeep, wherever you want that extra visibility, just that little bit of extra light, but you can put this wherever you want. This is just the recommended option. So, this is a 7-millimeter wrench that I'm using. I'm cranking down on the nut just to tighten that down, however, I am not spinning the screw on the back, just making sure that doesn't spin on its own. I don't want to damage the head of the screw back here just in case we do want to take it out. So, now we can just pop this back into place. This is just a couple of clips, so we're just going to line it up on either side. Like I said, this interior plastic is very easy to maneuver and manipulate. Just gonna make sure everything is all lined up then we can just pop it right back in place. All right. And that is solid. Now we can grab our light and mount that up. I would like to mention before you mount this up, you will need to install your batteries. You will need three AAA batteries that are not included in the package, but once those are in, you can test to see if those batteries work. And then we can line everything up and pull it into place. And you are all set to go with a new dome light. That's going to wrap it up for my very quick review and install. For more videos like this, keep it right in here at extremeterrain.com

      Product Information

      Features, Description, Reviews, Q&A, Specs & Installation

      Features

      • Rugged Ridge LED Interior Courtesy Light
      • Requires Three AAA Batteries (Not Included)
      • Acrylic Lens
      • Mounts to Interior Roll Bar
      • Single Unit
      • Fits 2007-2018 Wrangler JK Models

      Description

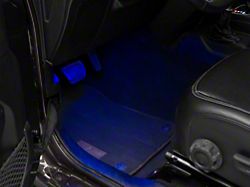
      Light Specs. Rugged Ridge provides this LED courtesy light as an innovative solution to light up your JK interior. This light is powered by three AAA batteries, so you won't have to worry about wiring. You have the option to easily attach it to any 2 to 3 inch roll bar, or to install it with screws within an interior location of your choice.

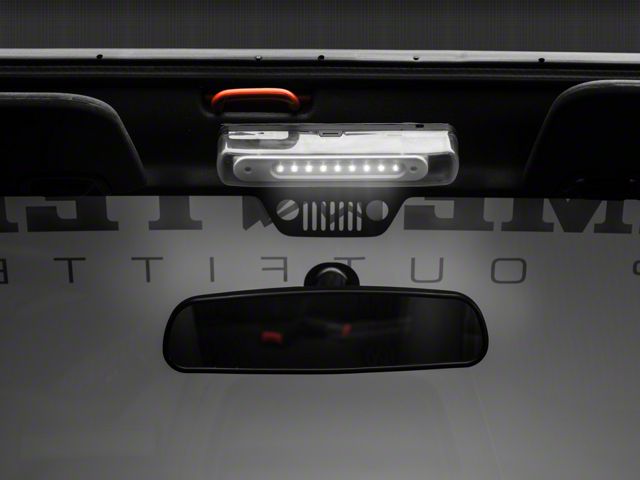
      Application. This unit fits 2007-2018 JK Wranglers.

      Fitment:

      Rugged Ridge 12430.01

      CA Residents: WARNING: Cancer and Reproductive Harm - www.P65Warnings.ca.gov

      Installation & What's in the Box

      Installation Info

      Tech Specs

      4.3

      Customer Reviews (72)

        Questions & Answers

        10 More Questions