Welcome, All Things Jeep is now ExtremeTerrain!
Talk to a Wrangler Sales Tech
1-877-870-8556
M-F 8:30A-11P, Sat-Sun 8:30A-9P
Logo Image
$20K Sweeps! 10 Chances to Win! Enter Daily >

Smittybilt Replacement Top with Tinted Windows and Upper Door Skins; Black Denim (97-06 Jeep Wrangler TJ w/ Factory Soft Top, Excluding Unlimited)

Item J14126
Verify parts fit and get product recommendations.
Wrangler Sales Techs: Connect Now M-F 8:30A-11P, Sat-Sun 8:30A-9P
$0.00
Our Price

$316.79

FREE Shipping Market Price $360.99 You Save 12% ($44.20) Up to 10% off for Military & First Responders! See Details

Will this fit your Vehicle?

Select a different vehicle Help?
Update or Change Vehicle
Ship to: Ashburn - 20149
Sorry, please enter a valid US or CA postal code
We're sorry, zip can't be updated at this time.
Recommended Install Shops
How It Works
Install Shops are available near Ashburn - 20149

Add Local Shop Installation

Total cost of service $499.00
    Create a list
    Add to New List

    Saved - View your saved items

    We're sorry. We couldn't save this product at this time.

    or use

      Video Review & Installation

      Merideth: If your factory top is old, worn out and in need of an update, this Smittybilt Replacement Top with tinted windows and upper door skins in black denim will be a great option to take a look at for your 1997 to 2006 TJ Wrangler. I would like to mention right off the bat that this will only be compatible for TJs with the factory soft-top frame and half doors. Now with that being said, a lot of the time, especially on older Wranglers, a soft top is one of those parts that really starts to show its age from constant sun exposure, weathering, and even some trail abuse if you take your TJ offroad. Now, this top will be an easy and budget-friendly way to refresh the look and function of your top with a full factory replacement with all three windows and the upper door skins. Getting into the construction. This will mimic the factory top with an 18-ounce black denim textured vinyl material and DOT-compliant tinted windows for a little bit of extra style but also some better insulation. This will also come with heavy-duty zippers for a very smooth feel, which will be a huge difference, especially from an old top, making it very easy to remove and reinstall your windows whenever you want to. And this will also have heat-treated seams for long-lasting durability.When it comes to price, this will come in at roughly $325, which will be one of your most affordable options in the category. Other options available on the page may differ a bit when it comes to the material, the color, or even some of the added features. Now, you'll see some options that will have a different material like a black diamond vinyl or a twill material that's a little bit heavier in weight, making them more of a premium choice than this black denim option. Now, the black denim vinyl will be a factory-style material, but it is gonna be on the lighter side when it comes to weight compared to some other choices, which is going to save you a couple of bucks in the long run. Not to mention, this top will work with the factory or factory-style frame as to where some other choices are specifically for aftermarket frames that come with different features.Now, I think if you're looking for a good quality, OEM style top, you want a top that's gonna refresh the look of your TJ, and you don't wanna break the bank in the meantime, then this is going to be a great choice. As far as install is concerned, this will be a pretty easy 1 out of 3 wrenches on the difficulty meter, taking you about 3 hours to get the job done. I would like to note that this should be installed at a temperature above 72 degrees Fahrenheit since the fabric may contract an inch or more at a colder temperature. Now, one of our customers here has installed this on their TJ and they're gonna walk you through the process step-by-step. So, that's gonna wrap it up for me. Let's get into the install.Justin: To complete this job, all you'll need is a Phillips head screwdriver. To make things easier, you could also use a drill instead. These were used to remove the screws along the front ridge of the top. I also had to use a box cutter as well as some pliers to get out those rusted screws that weren't gonna be able to be reused. You could also use the box cutter to remove parts of the old top that you won't be using, just to make it easier. But overall, it's a pretty simple job with simple tools that you should have.Hello, my name is Justin and this is my '98 Wrangler TJ Sport. And today I'll be showing you how to put on the new Smittybilt replacement top. I got one with the tinted windows and the upper door skins. So, before we take off the old top, we're gonna lay out the new top so the heat can make it softer, it'll be easier to put on. You wanna put this on a soft surface so you don't scratch the new windows all. All right. So, while these lay out, we wanna take off the whole top. Start with the front window panels. Just slide right out, set those aside. Go around to the other side, do the same thing. We're gonna work on the rear windows. Release all the Velcro. Unzip, it will fold right up. And lastly, the rear window. The zipper is broken on this one, so it's partially why I'm replacing it. All right. So we're gonna set this piece aside because we'll be saving this and using it.So, now we're going to unhook the top and fold it back. Start here. There's these little flaps right here you gotta pull out. And then, while I'm on this side, I'll unhook the latch. Up in here, close this, Pull off this back corner. And then on this side as well. Release the latch. All right. So everything should be disconnected now, so we'll be able to fold it back. So, if you wanna come around here. On the center bar right here, there's buttons. We're gonna disconnect all these buttons. And after we do that, this top bar is Velcroed. So, I'm gonna release all the Velcro here. Probably would've been easier to do this part. Just keep the top up above. All right, now we can fold it back. You come in here, these are the first screws that we'll have to undo on both sides. I'll be using a drill. You could also use just a hand Phillips screwdriver, but you wanna save these because we'll be reusing them. After we do these corners, we're gonna have to fold it up over itself, and then throw the whole top inside the jeep. [inaudible] Some of these are a bit rusted out, I might replace later, but for now I'll be reusing all these. All right, these ones down here are pretty bad. I'll have to get pliers and take those out. All right, so these screws are completely rusted out. There's no way of getting them out with a drill or screwdriver. So, what I'm gonna attempt to do is cut the canvas around, pull the canvas through, leaving the screws behind, and then using pliers to get it out. I'll be using X-Acto blade and pliers. If you had vice grips, that'd be best, but I couldn't locate them right now. So, try to cut these out.All right. We got the top off, let me get these screws out. Okay. So, if you're having the same problem, there might be other ways to do it, but it's the way I came up with and it seemed to work pretty well. All right, so we got the top completely off. Now we're gonna start putting on the new top. All right. So now we're gonna do pretty much the exact same thing but opposite. So, we start with throwing this in the back of the jeep. We're gonna line up these holes. I found some replacement screws, so we got enough to cover everything. We'll start in the center and then go to the wide ones and then work our way across to make sure we hit everything. Now, don't over tighten these. They don't have to be crazy tight and we don't want breakages. Make sure everything's lined up. Make sure the larger ones, those are the ones that are gonna go on the outside when we wrap it back around.All right. We finished up the top inline, so I am going to bring it back over the top and fold it under. For this part, just gotta bring this inside piece around the edge, and then tuck it under. Same thing. Put this inside piece inside. All right. So you want this to be snug. So push this in and then put in that last screw, the bigger one. Same thing here. Snug, kind of just have to feel for the hole. And that's pretty much the hardest part of this whole project. So, now having got these two screws in, we're gonna bring the whole thing back up. So, we can start with these buttons, they line this top side, we're gonna wrap around and flip it. All right, we got the buttons. Now, we got the Velcro down the center. Push it forward. Just make it tight. I like to go to the edges and then down the center. The tighter you make it now, the less it's gonna wave in the wind. All right. So the top is pretty much attached to the frame now.All that's left is these and the back-hand side. We got these clips that we did earlier. We'll put those back in but we'll start with the back corners. And it's pretty straightforward. If you pull down on here, gives you plenty of room to work with. You just pop that right in. Just make sure it's lined up on the corner. This should be flushed with the edge, put your body clip in. All right, we got both ends in. Now, we're gonna bring the whole thing forward with the front clips. Spread them, drop it in. They're tight when you first put them on. So, that's why we leave them in the sun to stretch out a bit. And then clamp it down on both sides. Then we'll go back up to this lip. When you clamp this in, clamp this fabric in between there. This is what you use to help pull it out later. Simple as that.All right. We got the new top on, now all we got is the windows. So, we'll start with the back window. That's gonna be the most complicated. Not too difficult though. We have to slide and reuse that bar we took off earlier. So, to reuse this, it stays in there like this, foam up. So, that means for our window, it will slide in this way. All right. And bring the zippers down this side. We're gonna feed in this first corner. So, with the new window, you're gonna feed the beginning of the zipper on this left-hand side through the top, out the bottom and then start it. There it goes, just gotta pull. So, once we have it zipped all the way around, it will get easier as this stretches out, we're gonna reuse the bar we were using before. Goes in there like so. Grab this lip here, just feed it through. You push that in. There's brackets on the inside. All right, we're done with the back.All right. Now we're gonna do the back side windows, going like this, the right side. So, now I'm gonna start with the side windows. Bring the zipper all the way to the right-hand side. Feed it in. Get it started. Once it's started and hanging on, I'm gonna get this edge in. This just works around your door frame. Once that's snug in place, then you can start to zip your shit. Now, before I clip it on the bottom, because that's gonna pull tension on it down this way, I wanna do the other side. Starting on this side, we wanna feed it through. Get it started and then side, then edges. Once that edge is in place, [inaudible] through, you can go ahead and zip the rest. All right. Add the Velcro first before clipping it up. Keep everything tight. Once you got all that in order, pin in the bottom. Just tuck it, push, it'll slide right into place. Same thing on this side, Velcro first. Tuck it, pop that into place.All right. Now all we have left is the front windows. I think I'll take those inside just to have an easier place to work. All right. So now, the final step is to take the skins off the door frames. [Inaudible] and it's a lot easier to do this. Unzip the window. All right. Starting this top corner, peel away. And if you have trouble getting this off, you could always cut it off because we're not gonna be reusing this. All right. Same thing but reversed. Start by unzipping. Start with this left corner and then work around. All right. Start with this right corner and then work around. All right. So once you have most of it in, there's this flap in this top corner. You wanna take this flap, go around the outside of the bar, and that's what's gonna guide the rest of it in, self-removing. Push it right in. Gonna [inaudible]. All right. That first one is done.All right. So same thing with the second window. We're gonna first unzip, then we'll turn the Velcro in. We're gonna start with this corner. This corner. Here we go, this corner. The corner with the tab, the corner that comes off easiest. Yeah. Set that aside. Put this back corner in first. All right. Once we get that corner popped in, start working around. And again, this last corner is gonna be the one with the tab. Feed the tab on the outside. Use that to work your way around. So, we've gotta get this last corner in. Start with the side tab. I'm gonna use the tab to guide it around. Here we go. We Velcro everything back into place. All right. Then we'll go back out to the car and slide these back in.Okay. So the last step you're gonna be doing is putting the windows back into place. Slide in the top one first, start coming down. That should slide in and then we're gonna cut off the excess weather strip. Doesn't have to be perfect, we just eyeball it. All right, done with that side. Same thing with this side. Put the top one in first and as that glides down, the other ones will line in. Cut off the excess. And, that was the last step. So, now we're done installing. And that's how you install the Smittybilt Replacement Top on a '98 Wrangler TJ Sport with the tinted windows and the upper door skins for the front. Thank You.Merideth: So that is going to wrap it up for my review and the install of the Smittybilt Replacement Top with tinted windows and upper door skins in black denim, fitting all 1997 to 2006, TJ Wranglers with half doors and the factory soft-top frame. For more videos and products just like this, remember to always keep it right here at extremeterrain.com.

      Product Information

      Features, Description, Reviews, Q&A, Specs & Installation

      Features & Specs

      • Should Be Installed at a Temperature Above 72°F Since Fabric May Contract an Inch or More at Colder Temperature
      • Shipping Can Cause Contraction or Wrinkling, but Will Resolve Itself a Few Days After Installation
      • Replaces Factory Soft Top Only
      • OE Replacement Top with Tinted Windows
      • Black
      • Marine Grade Vinyl
      • DOT Approved First Quality Window Materials
      • Seams are Treated and Sealed with Heat to Insure Moisture Wont Get Through
      • Side and Rear Windows Can Be Completely Zipped Out for Added Ventilation
      • Includes Upper Door Skins
      • Fits 1997-2006 Wrangler TJ with Factory Soft Tops

      Description

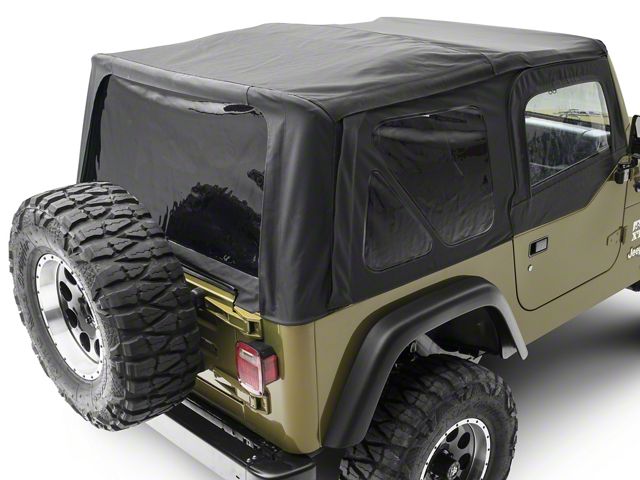
      Top of the Line. The Smittybilt Replacement Top w/ Upper Door Skins & Tinted Windows is a replacement top that is made with you, the Jeep enthusiast, in mind. This top is made for durability and to provide you with protection in all weather conditions. Each one of the seams on this product has been treated and heat sealed for a locked in protection you are after. You will find that this product works well with your existing factory soft top bow accessory, so not only is the product affordable, you do not have to go out of your way to install it. The Smittybilt Replacement Top w/ Upper Door Skins & Tinted Windows is the perfect addition to your Jeep when you need a replacement top and you want to maintain that quality stock 1997-2006 Wrangler TJ look.

      Handle Any Weather. With the Smittybilt OE replacement top, you will be able to weather any weather situation. You will find that this top has been heat treated and sealed to block out all moisture, even in the worst weather conditions.

      Marine Grade Vinyl. When you want a quality product, know that the Smittybilt Replacement Top w/ Upper Door Skins & Tinted Windows is just that. The top is made from a marine quality vinyl that will withstand any weather condition or event that you put your Jeep through. The top comes with DOT approved tinted windows and all of the zippers and seals are treated to ensure durability at all times.

      Three-Hour Install. While the Smittybilt Replacement Top w/ Upper Door Skins & Tinted Windows is easy to install, it can be a bit time consuming, especially for those who are not somewhat familiar with installation. You will find that the top comes with all of the hardware needed. This top does require your factory style soft bow assembly.

      Warranty. 3-Year Warranty.

      Application. The Smittybilt Replacement Top w/ Upper Door Skins & Tinted Windows, Black Denim its 1997-2006 Wrangler TJ using a factory style soft top bow assembly. Will not work in conjunction with aftermarket style soft top frames.

      Installation Note.This soft top should be installed at a temperature of 72°F since the fabric may contract an inch or more at colder temperatures. The top will contract and wrinkle during shipping, but have no fear. A few days after installation, the fabric should look fine.

      Fitment:

      Details

      Smittybilt 9970235

      CA Residents: WARNING: Cancer and Reproductive Harm - www.P65Warnings.ca.gov

      Installation & What's in the Box

      Installation Info

      What's in the Box

      • Top Fabric
      • (2) Quarter Windows
      • Rear Window
      • (2) Upper Door Skins

      4.7

      Customer Reviews (189)

        Questions & Answers

        10 More Questions

        Will It Fit My Wrangler

        • TJ Rubicon 2 Door - 03, 04, 05, 06
        • TJ Wrangler 2 Door - 97, 98, 99, 00, 01, 02, 03, 04, 05, 06

        Requires Use of Factory Soft-Top Hardware.