Welcome, All Things Jeep is now ExtremeTerrain!
Talk to a Wrangler Sales Tech
1-877-870-8556
M-F 8:30A-11P, Sat-Sun 8:30A-9P
Logo Image
$20K Sweeps! 10 Chances to Win! Enter Daily >

Smittybilt XRC Body Cladding; Black Textured (07-18 Jeep Wrangler JK 4-Door)

Item J17694
Verify parts fit and get product recommendations.
Wrangler Sales Techs: Connect Now M-F 8:30A-11P, Sat-Sun 8:30A-9P
$0.00
Our Price

$223.14

FREE Shipping Market Price $253.99 You Save 12% ($30.85) Up to 10% off for Military & First Responders! See Details

Will this fit your Vehicle?

Select a different vehicle Help?
Update or Change Vehicle
Out of Stock

Ship to: Ashburn - 20149
Sorry, please enter a valid US or CA postal code
We're sorry, zip can't be updated at this time.
    Create a list
    Add to New List

    Saved - View your saved items

    We're sorry. We couldn't save this product at this time.

    or use

      Video Review & Installation

      Hey, guys. So today I'm here with the Smittybilt XRC Side Body Cladding in Textured Black, fitting all 2007 to 2018 4-Door JK Wranglers. So one of the most vulnerable areas on your Wrangler is your rocker area, and you definitely wanna keep it protected while you're out on the trail. So this option by Smittybilt is gonna do a really good job at protecting your body from any of those lower obstacles like stumps or rocks that you might come in contact with on the trail or even any kickup on the street. You definitely wanna keep this protected. So this is gonna be made of a 3/16th-inch heavy-duty plated steel, providing you that protection that you may be looking for. But it's also gonna have a nice textured black powder coat finish, and that's going to protect the steel underneath from any rust or corrosion. But what it's also gonna do is help you achieve an off-road and more aggressive look to the side of your Wrangler, not to mention this is gonna be perfect to cover up any existing damage. So if you're out on the trail, you took a hit, and you have some existing scuffs or scratches here, this is gonna do a really good job at covering it up. So these are gonna be very affordable at roughly $200, making these one of the most affordable options for cladding or side body protection on the page right now. So other options are going to be a little bit more in-depth. This is gonna be a pretty basic design. Nonetheless, it looks really good mounted up to the side of our Wrangler. But it's not going to provide some of that under body protection that others may offer, and it's not going to have a solid design. So this is gonna be a modular design. It is gonna stay pretty far up the body. It's not going to come down and meet that pinch weld down there. So other options might just be a little bit more in-depth, but that's gonna be good because that's gonna keep this price low on it, it still looks very good mounted up to the side of our Wrangler, and it's still gonna get the job done.So install's gonna be a three out of three wrenches on the difficulty meter. Now, there is a decent amount of drilling required. However, the rest of the install is pretty easy after you get done with that drilling. So speaking of that install, let's jump into that now. The tools that I used for this install were PB B'laster, or you could use any type of lubricant for your drill bits, a 3/8-inch drive ratchet, a center punch, a marker, a 6-millimeter Allen socket, a 3-inch extension, a step bit, a 5/16th-inch, 3/8-inch, and 1/2-inch drill bit, a pair of safety glasses, a drill, and a rivnut tool.So the first thing that we have to do for this install is just make sure that we have all the correct pieces for either side and make sure that they're oriented in the correct way. You wanna make sure that all of the holes are facing the top. And then we can go ahead and test fit our panels, so we can mark and drill for our holes. So what we're gonna do is start in the middle and then work our way out. So grab this middle piece, line up our center panel here. These are gonna line up with each break in the body, and you also wanna make sure that it's lining up with the body along the doors. You also wanna make sure that this crease down here is sitting flush inside the panel. And once you have it in position, you can grab a marker, and we can mark our holes. Also just gonna draw a faint line over here. Make sure that that is lining up with our back panel. So we can do the same thing for our back panel here. Then we can move up to the front here. Like I said, there's gonna be a panel for each break in this body line, and if you do need to go back, what you can do is line this up with the previous holes in the center piece. Make sure that everything's fitting properly. Make sure it's sitting on that crease, sitting flush. Now, at this point, we can take a center punch and center punch each of our markings. So now we're ready to drill out all of our holes here. Now, I'm gonna start with a 5/16th-inch drill bit, step up to a 3/8-inch drill bit, and then, finally, we're gonna use a 1/2-inch drill bit. That's the size that we need for our rivnuts. So we're gonna start off with our 5/16th and move down the line. So what I'm gonna, at this point, is switch over to a step bit. This is just going to quicken up the drilling process since we do have 42 holes in total that we have to drill out, so I am just going to use a step bit. We're going to go up to a 1/2-inch, a little over a 1/2-inch, so we can get in our Nutserts. So on the other side of this front panel, there is gonna be another piece of metal. We do have to drill through that as well in order to make enough room for our Nutsert. So if you have to take a center punch through this hole into the other one, I would do so now, and then we can go ahead and continue to drill this out. So right now, I'm focusing on that inner piece of metal there. We do have the outer hole the size that we need it to. I'm stepping down to a 3/8-inch drill bit and going to try to round out that inner hole. So, at this point, what we can do is grab our Nutsert tool. If you don't have one of these, I would recommend to go to your local auto parts store and rent one. This is gonna make your life a whole lot easier in comparison to the other method that Smittybilt has provided you. But what we're gonna do is just thread on our Nutsert with the tool open, insert our Nutsert in our drilled hole, and then clamp it down. So after we have our holes drilled out and our Nutserts installed, we can repeat that process for the other three panels down the line. So, at this point, what I'm gonna do, just to make sure all of our holes are lined up correctly, is install a Nutsert at the back and a Nutsert of the front of this second plate back from the front. So what I'm gonna do now, at this point, is just line up our plates and get them bolted into place, so we can drill through the rest of our holes. I wanna make sure that everything's lined up. So you're gonna be provided with button head bolt hardware. We're just gonna hand thread those on. They don't need to be tight. They just need to hold the plate in place. So what I'm gonna do, at this point, is take my step bit and get these holes started. All right, now we can take these out. So now I'm just gonna continue to widen them up. It should be a little bit over a 1/2-inch, is the measurement in order to get this Nutsert in. So, after you have them drilled out, I would just check them if you need to do a little bit.So what I'm gonna do with this middle panel is the same thing that we did with this one. Just use this as a template. We're going to drill out the three holes, one in the front, one in the back, and then one up at the top here, and we're gonna use it as a template to drill the other holes. So I can grab our middle panel, line everything up, and bolt it into place. Then we can drill out the rest of our holes for this center panel. Now that it's mounted up, if you have to re-adjust where your center is, just take your center punch and make a mark, so your drill bit will stamp it. Then we're gonna go ahead and finish up these last three, drilling them out, and then we'll insert that Nutsert.So our last and final step is just to bolt up our plate. Just wanna line everything up and thread in your provided hardware. So once you have them all tightened pretty much down by hand, we can go ahead and tighten them down with a 6-millimeter Allen key. Now, you wanna sure that you don't overtighten them, just because you don't want the rivnut to spin, but we do wanna make sure that this is pretty snug. So after everything's all tightened up, you're all set to go.So that's gonna wrap it up for my review and install. Make sure you like and subscribe, and for more videos like this, always keep it right here at extremeterrain.com.

      Product Information

      Features, Description, Reviews, Q&A, Specs & Installation

      Features & Specs

      • Four-Door Body Cladding
      • 3/16 Inch Cold-Rolled Steel
      • Two-Stage Powder Coating
      • Protects Rockers
      • 5 Year Limited Warranty
      • Drill Installation with Included 304 Stainless Steel Hardware
      • Fits 2007-2018 JK Wranglers with 4 Doors

      Description

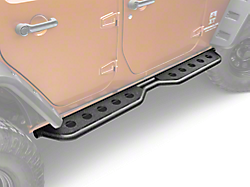
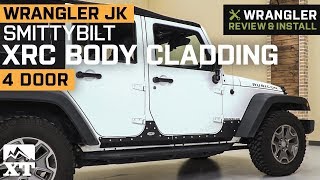
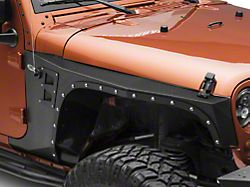
      Construction. Fabricated out of tough 3/16 inch cold rolled steel, Smittybilt's body cladding armor for the rockers are made for the most unrelenting wheeling, shrugging off rocks, stumps, and brush. Smittybilt's proprietary two-stage powder coating defeats all kinds of corrosion and provides a slick surface that shrugs off glancing impacts.

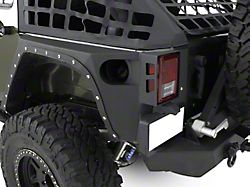
      Protection. This body cladding shields your rocker panels, defending them from vegetation, rocks, and earth banks alike. These extra sturdy armor pieces can be matched up with XRC Rock Sliders to gain outstanding lower quarter panel protection.

      Accessories. These Smittybilt armor components come with button head hardware manufactured out of 304 marine-grade stainless steel.

      Application. These body cladding pieces fit onto 4-door models of 2007-2018 JK Wranglers, attaching to drilled holes. Consult the installation guide for drilling instructions and tool recommendations.

      Fitment:

      Details

      Smittybilt 76887

      CA Residents: WARNING: Cancer and Reproductive Harm - www.P65Warnings.ca.gov

      Installation & What's in the Box

      Installation Info

      What's in the Box

      • (1) Armor - Front Driver (Stock Fender)
      • (1) Armor - Front Driver (XRC Fender)
      • (2) Armor - Front Door Plates
      • (1) Armor - B Pillar Driver
      • (1) Armor - B Pillar Passenger
      • (1) Armor - Rear Driver (Stock Fender)
      • (1) Armor - Rear Driver (XRC Fender)
      • (1) Armor - Front Passenger (Stock Fender)
      • (1) Armor - Front Passenger (XRC Fender)
      • (1) Armor - Rear Passenger (Stock Fender)
      • (1) Armor - Rear Passenger (XRC Fender)
      • (3) Nut Certs
      • (1) Nut Cert Tool
      • (1) Button Heads Hardware Pack

      4.6

      Customer Reviews (500+)

        Questions & Answers

        10 More Questions

        Will It Fit My Wrangler

        • JK Rubicon 4 Door - 07, 08, 09, 10, 11, 12, 13, 14, 15, 16, 17, 18
        • JK Wrangler 4 Door - 07, 08, 09, 10, 11, 12, 13, 14, 15, 16, 17, 18

            Related Wrangler Categories